Cases can help you keep track of a specific topic or assignment you’re working on, including all related findings, alerts, saved searches, and search blocks. You can set up Cases for yourself, or invite other Vision UI users from your organization to work on Cases with you. When a Case is shared, you’ll see a Team icon next to the Case name in your main list.

Creating a Case
1. To get started, navigate to the Cases section, and click on Add New Case. (Once you’ve added a Case, the button will appear on the left side of the screen, as in the screenshot above.)

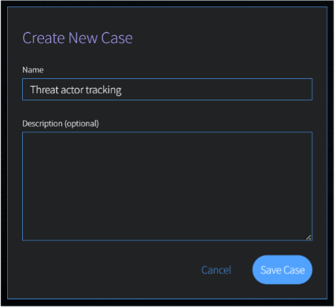
2. On the Create New Case modal, give your Case a name, so you can easily navigate back to it. You can optionally add a description for the case; you can always update the name or description at a later time. Once you’re ready to continue, click Save Case. A Case Created modal will appear.
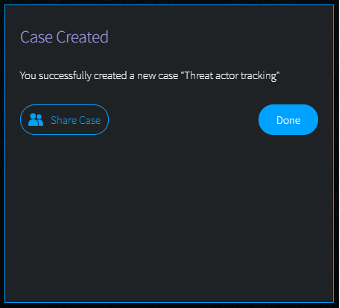
3. If this is your own Case, click Done. If you’d like to collaborate with another Vision UI user in your organization, click the Share Case button on the confirmation modal. You can always add members to the Case later.
4. Once you’ve created a Case, you can:
- Add Saved Searches (or, optionally, Search Blocks) into it. Any subsequent Alerts generated from the Saved Searches within the Case will automatically appear in the case, in the Case Alerts tab.
- Add Findings into it. Findings are search results or alert results that you would like to preserve. Findings can be ranked with Criticality and organized by Tag. Additionally, you or the team can add Notes to a Finding.
Learn more in the Creating a Finding and Working with Findings articles.
5. Case Navigation Buttons will help you quickly toggle between Cases. Click BACK to return to the main Case page. Previous Case and Next Case navigation will appear when you’ve set up multiple cases, enabling you to quickly switch between Case details.
![]()